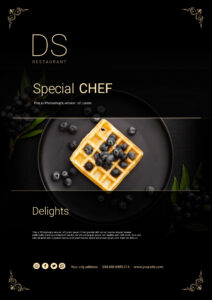
Restaurant menu food design with Adobe Photoshop files
$50.00Original price was: $50.00.$4.99Current price is: $4.99.
Creating a restaurant menu design with Adobe Photoshop can be an exciting project that allows you to blend creativity with functionality. Below is a step-by-step guide to help you design a professional menu, complete with tips on organizing your Photoshop files.
Size: Choose your menu size based on your preference or printing needs. Common sizes include 8.5×11 inches (standard letter), 5×7 inches (small menu), or even 11×17 inches (tabloid size for more space).
Resolution: Set the resolution to 300 dpi for high-quality print.
Color Mode: Use CMYK color mode for printing, or RGB if the menu is digital-only.
Step 2: Create the Background
Solid Color or Gradient:
Use a solid color or a subtle gradient as the background. Keep it neutral if you want the text and images to stand out, or go bold with colors that match your restaurant’s branding.
Texture or Patterns:
Add a texture or pattern overlay to give the background depth. This could be a subtle paper texture, wood grain, or any other pattern that fits your restaurant’s theme.
Step 3: Design the Layout
Guides and Margins:
Use guides to create margins and align elements consistently. Keep around 0.5 inches of padding from the edges.
Header Section:
At the top of the menu, include the restaurant’s name and logo. Use a stylish font that reflects the restaurant’s brand.
You might also include the restaurant’s tagline or a brief introduction.
Section Headers:
Divide the menu into sections like Appetizers, Main Courses, Desserts, and Beverages.
Use bold or larger font sizes for section headers to create a clear hierarchy.
Menu Items:
Dish Name: Use a slightly larger or bolder font.
Description: Write a brief description of each dish, including key ingredients and cooking styles.
Price: Align the price to the right or include it after the description.
You can also add icons or small graphics next to certain items, like a chili pepper for spicy dishes or a leaf for vegetarian options.
Step 4: Incorporate Visual Elements
Images of Dishes:
Include high-quality images of featured dishes. These can be placed alongside the corresponding menu item or in a dedicated image section.
Ensure the images are properly edited for color and contrast, and use layer masks to integrate them seamlessly into the design.
Borders and Dividers:
Use thin lines, dotted dividers, or other graphical elements to separate sections and items.
These can be simple or decorative, depending on the overall theme.
Specials or Highlight Boxes:
Create a box or highlighted area for specials, chef’s recommendations, or combo deals.
This draws attention to these items and adds visual interest.
Step 5: Finalize the Design
Review Layout and Alignment:
Double-check that all text and elements are properly aligned and spaced.
Ensure the font sizes are consistent and legible.
Proofread:
Check for any spelling or grammar errors in the dish names and descriptions.
Make sure all prices are correct and in the right currency format.
Add Bleed (if needed):
If your design will be printed, add a 0.125-inch bleed around the edges to ensure no important elements are cut off during printing.
Step 6: Organize and Save Your Photoshop Files
Layer Organization:
Group related layers together (e.g., all text layers in one group, images in another).
Name your layers and groups clearly for easy editing.
Saving Files:
Save your work as a PSD file to retain all layers for future edits.
Export the final design as a high-resolution PDF for printing, or as JPEG/PNG for digital use.
You might also want to save different versions (e.g., with different color schemes or layouts) in separate files.
Step 7: Print or Publish
Printing: Send the final PDF to a professional printer. Make sure to discuss the paper type, finish (glossy or matte), and any other specifics.
Digital Publishing: If you’re publishing the menu online, compress the images and export at a lower resolution to ensure fast loading times.
With this guide, you should be well on your way to creating a stunning and professional restaurant menu using Adobe Photoshop. Enjoy the process, and let your creativity shine!


Reviews
There are no reviews yet.